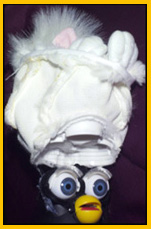
Step One: Skinning
After removing the batteries, we set to work on skinning his furry little carcass. Working his skin off bottom up seemed the natural way. By carefully opening a few stitches that were visible beneath his tail, we exposed a cable tie which was pulled through the fabric around his base like a drawstring. Snipping the cable tie released his skin to be pulled up further.
Step Two: Removing The Ears
The ears are attached to two thin plastic spears with arrowhead ends. Start by lowering the ears and folding the ear skin inside out at the base of the moving part (the other end of the fabric is sewn to the skin). Do this carefully -- you don't want to snap the delicate plastic ear bones. When the arrowhead is exposed, you will see a small loop of stitching tying the ear fabric to the bone. Snip it and pull the fabric ear over the plastic.
Step Three: More Skinning
Pull the skin over the ears one at a time, being careful to avoid putting pressure on the delicate ear bones. Turn the the skin inside-out as you pull it off, leaving only the face attached to the body. With a small, thin, flat object (screwdriver, small scissors, etc.) snip through the glue which holds the face & skin to the body. The facial plastic is sewn directly to the skin and will come off all in one piece, leaving the eyes, mouth, and sensors still attached to the body. Put the skin away in a safe place, or wash it to remove the blood, second hand smoke odor, or dog spit. It also makes a nice hand puppet.
Step Four: Remove the Carapace
Unscrew the Phillips head screws holding the two halves of the exoskeleton together. When pulling them apart, be careful of the ear bones and the microphone. Gently pull the microphone out from the inside of the half shell.
|

 |